
Good luck putting your cute Chip Sharpie Mug in the cupboard! This craft is so simple to do and looks great you won’t want to stop looking at it. Plus, the little teacup, Chip from the movie is so sweet! With the new 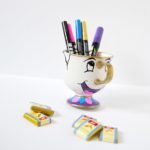 reenactment of Beauty and the Beast premiering soon, there is no better time to celebrate than with a Beauty and the Beast inspired chip sharpie mug. If you really want to get into the spirt of Belle and all the other magical characters from the movie, have a Beauty and the Beast inspired party! This craft is a great way get excited for the new movie and it is perfect for any age! Find the complete instructions here from the blog, A Pop of Red.
Easily find all of the supplies needed for this craft at your local craft store and even at your local thrift store. This is a very inexpensive activity that requires very little prep time. Not only does it take a short amount of time to prepare, but doesn’t take very long to create! It is a great way to entertain small guests at a party or a super fun after school activity. This chip sharpie mug activity would be better suited for children who are able to color and draw on their own but can still include anyone no matter their coloring abilities. It is advised to have adult supervision throughout this craft.
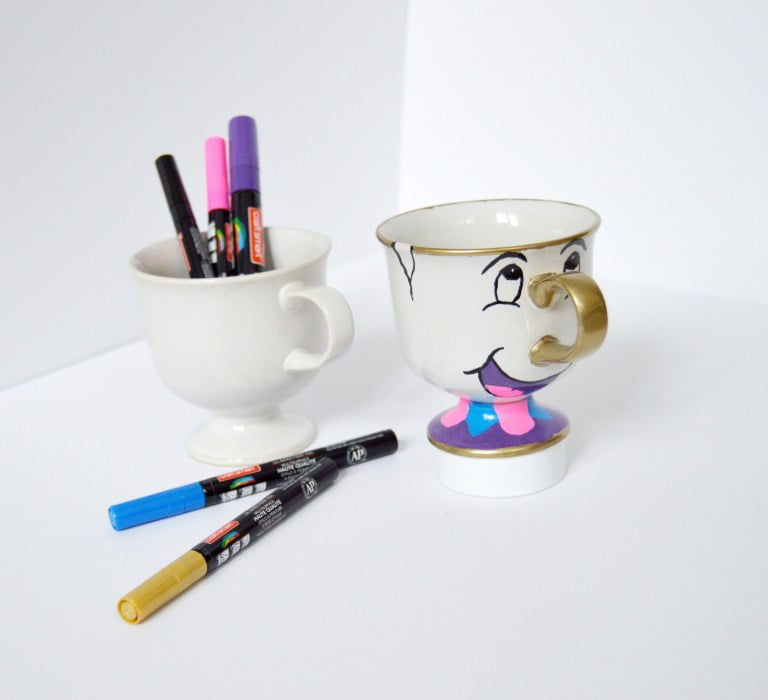
Start this craft with an old mug. Find a mug at a thrift store or one that might just be lying around the house. Be sure to find a mug that is white. The white color makes it easier to color on top of. Next, buy colored markers! It is best to use oil-based paint pens but regular Sharpie markers work too. Most craft stores carry oil-based paint pens but you can also find them online here. Black, blue, pink, purple and gold pens are the colors used in this craft. 
I found it helpful to look at a picture of Chip while painting the cup. This makes it easier to color in the gold along the rim on the cup and the details on the bottom. After adding the gold, be sure to leave a space to draw a chip. It might be intimidating to try and free hand Chip’s face but it is easy to do! Print a template from the internet if that would be easier for your chip sharpie mug.
After the drawing is done, there is only one more step before enjoying your chip sharpie mug. Lastly, you need to heat the cup in the oven to set the oil-based markers. Place the cup in the over and turn the heat to 400 degrees. Let mug set for 45 minutes and then turn the oven off leaving the mug inside until cool.
I suggest to hand wash these cups rather than washing them in a dishwasher just so the paint lasts longer. Although this craft takes a little bit of drawing ability, anyone can do it and the final product is just too cute! Have a little tea party with these fun cups or use them as your regular mug. We would love to see your final product, so drop us a picture of your final chip sharpie mug!